
Helping You Create Clothes That Make You Feel Great By Providing Fashionable Sewing Patterns That Fit
Have you ever wanted to personalize your handmade items with your Own Designer Clothing Labels?
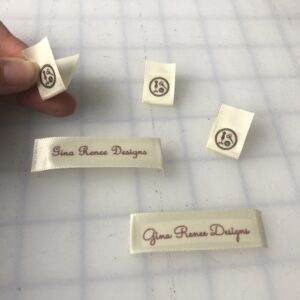
There’s no better way to complete a handmade item than by designing and printing your own clothing labels. This can be done using this simple method!
- Find a plain ribbon in a neutral or pale color to compliment your brand. (I suggest a double sided satin for more durability) (paid links*)
- Measure the width of the ribbon. (paidlink*)
- Create your own design in a word document or Adobe Illustrator if this is available to you, following the method below.
- Print the design onto iron-on transfer paper using an inkjet printer. (paidlink*)
Iron the design onto your ribbon.
Here’s how to create your own clothing labels in either Microsoft Word or in Illustrator:Creating your label design in a Word document
In order to create the design in Word you need to create a text box and then you can either use your logo or write the name of your brand, make sure that it will fit onto your ribbon by checking the height of your text /logo. Download the guide for step-by-step images for the below instructions.
1. From the insert tab – click text box (follow along in the downloaded guide for images).
2. Type your design or import your logo as a picture. (Click inside the text box, from the insert tab, select Pictures – from file and then insert your logo/ image.
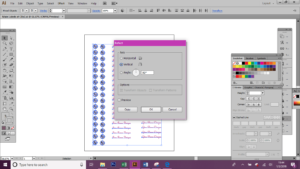
3. Select the logo or text and right click and select copy (or hold down the ctrl and ‘c’ buttons on the keyboard) to copy the design, click return and then paste (right click and select Paste, or hold down the ctrl and ‘v’ button) in rows down the page as show below.
In order for the design to appear the correct way round when ironing onto your ribbon, the image will need to be flipped/ mirrored before printing.
To flip it, do the following:
1. Right-click the text box and choose Format Shape and Choose 3-D Rotation in the left pane.
2. Change the X setting to 180.
3. Click OK, and Word flips the text in the text box, producing a mirror image
Creating your label design in Adobe Illustrator
1. Once you have created your design, Select all by going to select, then “All”. (Alternatively drag your curser over the whole design to select all)
2. Reflect the entire image by selecting the ‘Object’ tab, then ‘Transform’ and ‘Reflect’. (It must be reflected, otherwise the type or images will be reversed when Ironed on. Especially if you have any text, it’s critical you reflect or mirror it.)

Choose the vertical option.
When the image has been reversed you can print on to transfer paper.
Place the transfer paper in the printer, making sure the printing part will go on the side that is the iron-on side.
**You can only use an ink-jet printer.**
Here are the final steps in making your own clothing labels:
Cut out the pieces and Iron them on to the ribbon.
Use as high of an Iron setting as the ribbon allows (don’t burn it!)
Make sure to apply a lot of pressure as you iron and leave for about 30 seconds. If the transfer doesn’t easily peel off, it’s not ready. Check a corner first before trying to peel off the entire transfer.
The larger your transfer is, the longer the ironing takes.
Cut out the pieces and Iron them on to the ribbon.
Congrats! You’ve just successfully designed and made your own clothing labels! Time to get sewing so you can put them in your new designs 🙂 Happy Sewing!
Gina Renee Designs is an affiliate of Amazon in order to help promote her favorite sewing tools. *As an Amazon Associate I earn from qualifying purchases.
You May Also Be Interested In:

Zero Waste Kit

Pattern Making Tool You Need To Have

Across Shoulder Too Wide